Quick Links
As you dive intoGeometry Dash, you’ll immerse yourself in a rhythmic experience primarily crafted by other players. The longer you engage with this experience, you may develop a curiosity to become a part of it, either by creating your own levels or experimenting with the level creation process to understand how it works.
When you think about creating your own level and entering the level editor, you’ll come across a multitude of buttons and options that might be confusing. That’s why this guide is here to assist you in getting started with the level editor and becoming familiar with its functions.

How To Start A New Level
When you create a new level or explore the level editor, start by going to the level editor. You can do this fromthe main screenbyclicking on the iconshaped like a hammer and wrenchon the right, thenclick on “Create.“This directly takes you to the"My Levels” menu, where you can create a new level or edit and view the levels you’ve created or copied before.
Uponclicking “New"or selecting a specific level you’ve worked on before, you’ll seethe level menu.Here, you’re able to input the level name and a description (optional). In the middle, you’ll notice the three main buttons.The middle button allows you to play the level, theright button enables you to upload the level, and theleft button provides access to editing the level.

Any level starts asunverified, and you must turn it into averified level by completing it yourself before you’re able to upload it. Additionally, having a login account in the game is essential to upload any level.
You will also have buttons on the right side, such as"Help,“which opens a guide for the level editor,“Duplicate"to make a copy of the level, and"Move Top"to shift the current level to the top of your levels list.

Before creating a challenging level, remember thatyou must be the first to complete the level, whichis crucial for uploading it.
If your level includes user coins, make sure tocollect them. With each attempt, if you collect any coin, you’ll notice the requirement tag beside the “Unverified” status changing to include the coins you haven’t obtained yet.

Level Settings
When you enter the editor, setting up your level settings is the first step.Click on the gear icon at the top rightof the screen toopen the level settings.
From here, you’ll find yourself configuring the fundamental aspects of your level.Determine the type of your level, whether it will be aclassic levelwith the auto-scroll screenor a platformer, which allows for free movement.

“Speed” lets youchoose the speed of the level. There are five types of speed available, and you start with the normal speed, indicated by the color blue.
It’s recommended toleave the speed setting as one of the last decisions, as you need to choose a speed suitable for your level’s overall design and difficulty.

The next step is tochoose the mode your level will start with. You can make this selectionfrom the “Mode"settings, where you will have eight types of modes to choose from. This determines the way the player will move when clicking.
During gameplay, you may change the mode using portals from the Gameplay Objects. Each portal serves as a mode changer while you’re playing.

You can also access more options under the"Option"label from the gear icon. Here, you will find features such asMini Mode, which makes the player icon smaller than normal. There’s alsoDual Mode, which duplicates the icon into two, allowing you to control both with one click or each one individually whenTwo-Player Modeis enabled. Additionally, options like Rotate Gameplay, Flip Gravity, and Reverse Gameplay are self-explanatory based on their names.
Under BG (Background), G (Ground), and MG (Middleground), you canchoose the appearance elements for your level. You can change the color for each element using the"Select Color.“This allows you to customize the visual aspects of each layer of background in your level. Additionally, you have the option to change the font.

The last option you have is"Select Song.” “Normal” refers to the songs in the main levels, and “Custom” leads you to themusic library and Newgroundsoption, providing you with a broader selection of music for your level.
As you attempt to create a level for the first time, the key considerations are the Game Type you want for your level and the mode you intend to start with.

Level Editor UI
Once the level settings are determined, you can start placing level objects to build your level. As youreturn to the editor screen, you will find it separated intothree components, each including a type of button. To start placing objects, it’s important to understand what each button type does.
Left Section
As you focus on the left side of the screen, you will find some buttons. They are divided as follows. On the top are theUndo and Redobuttons for the recent action, and thedelete button, shaped like a garbage bin, allows you to delete the selected object.
Under these three buttons, we haveplaytesting buttons. The topone plays the musicof the level, showing a line moving to help sync visuals to the song. The lower button lets youplay your level inside the editor to test it startingfrom the start or set a start position using the start pos trigger.
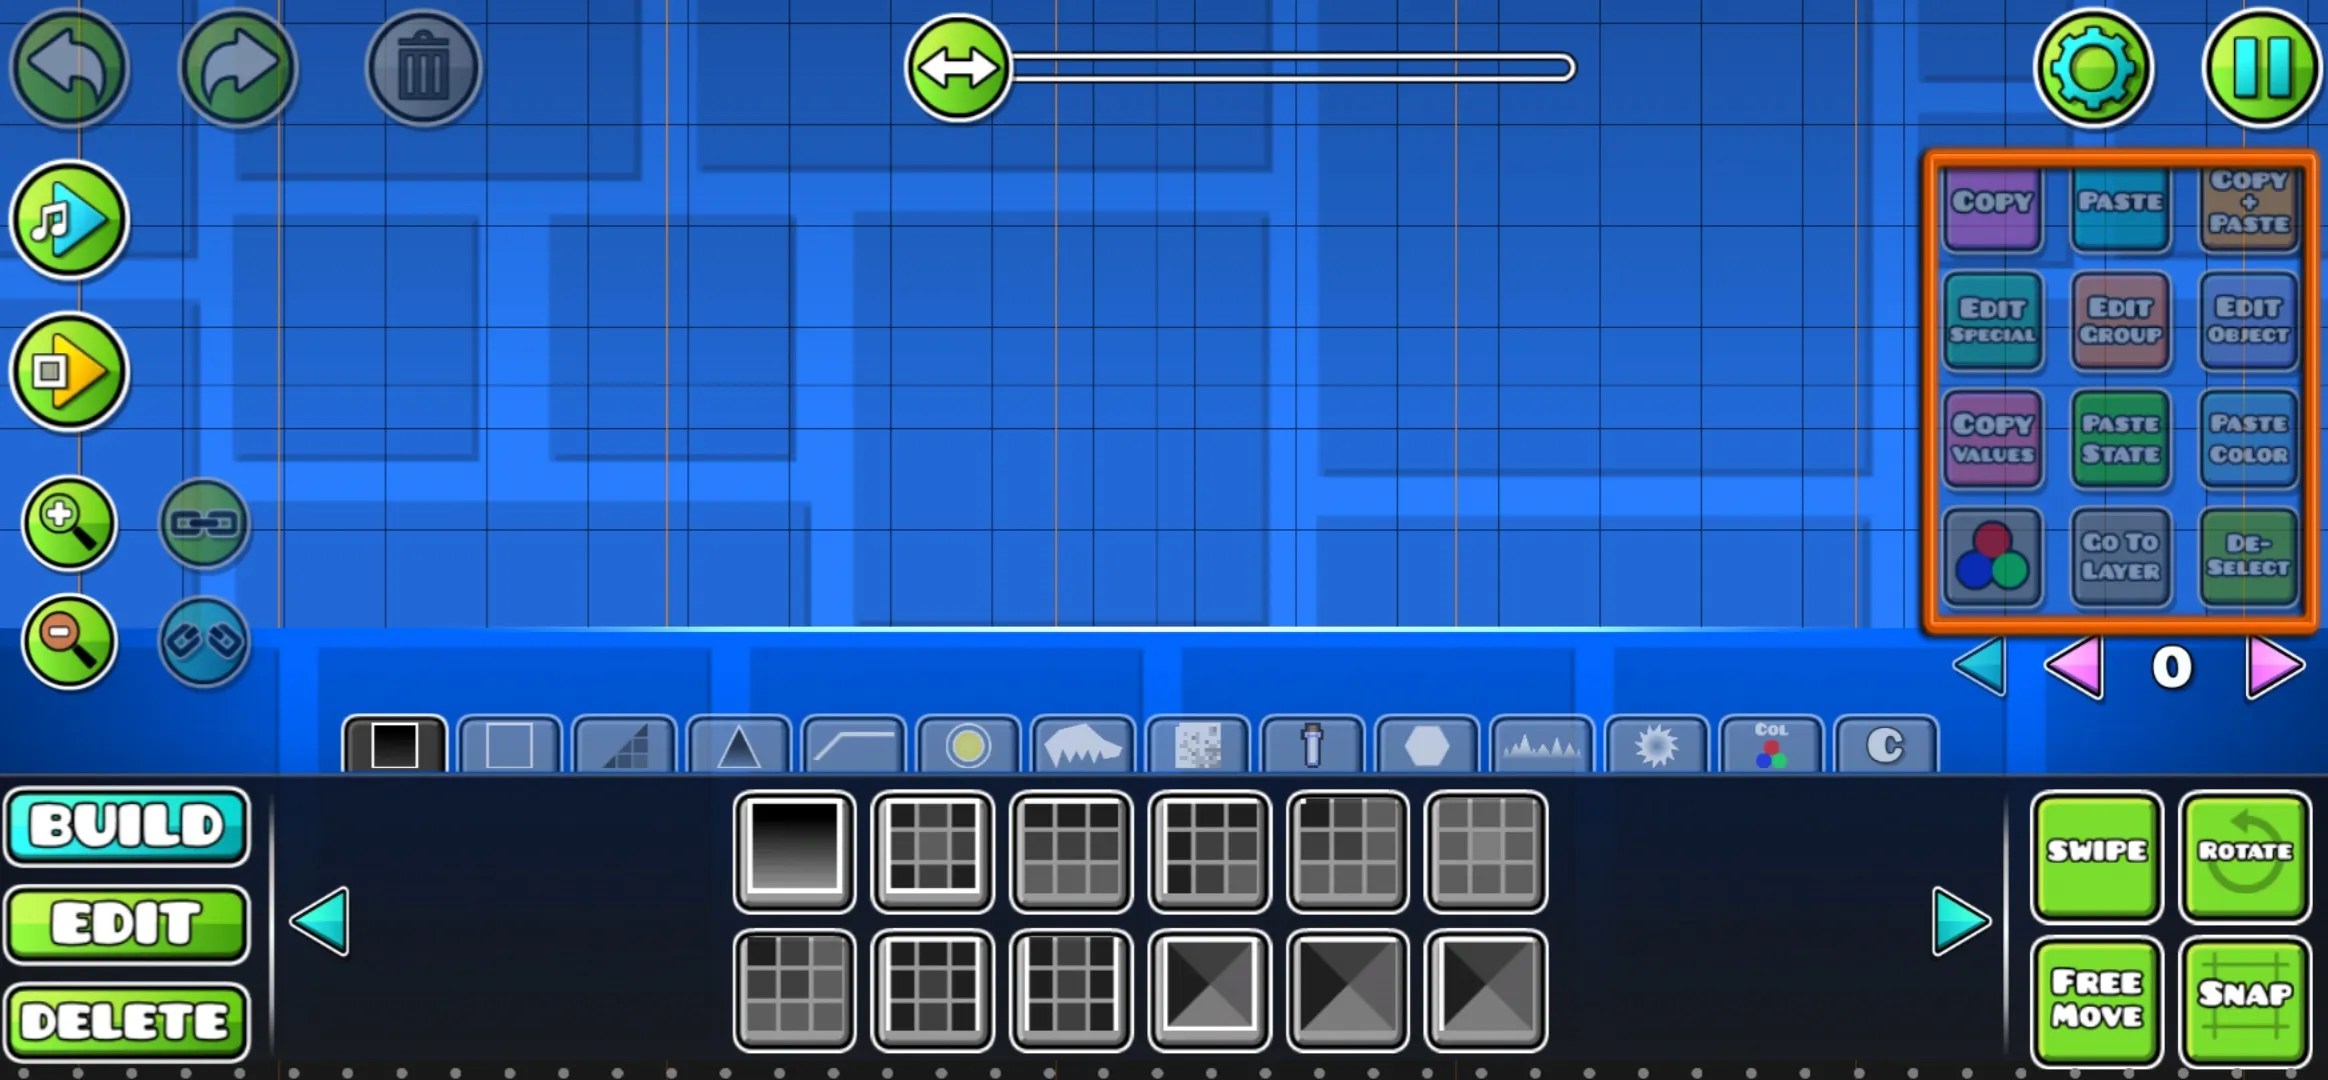
The last four buttons includezoom in, zoom out, and thelink and unlinkbuttons. The link and unlink buttons allow you to connect objects to control them collectively or unlink them. You canenable the link and unlinkbuttonsfrom the top right pause button. Click on the gear button toaccess more options, and you will find the"Enable Link Controls"option to check it.
Right Section
The buttons here are divided intocopy, paste, and copy + paste,which allow you to copy and paste objects in the editor. However, the option ofcopy + paste will duplicate the object in the same place.
Copy Values and Paste Stateallow copying group IDs and pasting them. Additionally, there’s another button with the option ofPaste Colorto paste the color after copying values.
Edit Groupis one of the most important buttons, allowingyou to add group IDs to an object to control it. For example, if you want to create a moving object, you’re able to assign a group ID to the specific object to handle it in the move trigger.
In addition, you will find an"Edit Object"button that opens a panel for the object, enabling you to adjust its color. As the name suggests,the “De-Select” buttondeselects the currently selected object. The"Edit Special"option allows you to customize certain objects, such as rotating ones,allowing you to change their speed and direction.
Bottom Section
This is where you will have control over all gameplay objects, and your level will be designed from this area. This section can be divided into theObjectsin the middle andBuild, Edit, Delete buttonson the left, andSwipe, Rotate, Snap, and Free Moveon the right.
While creating a new level, this build section will be the most interacting area as you need to place all objects from here.
TheEdit buttonfunctions as a tool to edit the objects you’ve placed.Enabling the Swipebutton allows you toselect multiple objects, with the selected objects indicated by a green outline.Swipe also works for deletingmultiple objectsin delete modeand building multiple objectsin build mode.
The"Free Move” and “Snap"buttons help you move the selected objects, withFree Move allowing for a free positionandSnap restricting the position within the limits of the grid. Finally, theRotate buttonserves as a tool that allows you tofreely rotate the selected object.
Building Objects
Now that you know the functions of each button, you will be able to place all the objects that must be included in your level.
Description
Blocks
This section is divided into two types:platforms that can collide with the player, andshapes that you can pass through.
Outlines
Create outlinesyou can interact with, and add them as a layer of platforming.
Slopes
Another section of platforms consists of slopes, whichfunction similarly to blocksbut have a different shape.
Spikes function asobstacles and lead to lossupon any collision.
3D
you’re able to add these objects to other platforms to give them a3D appearance.
Gameplay Objects
Find gameplay objects such asspeed changers, portals, orbs, and checkpoints,which are useful if you’re creating a platformer game type.
Animated Objects
Similar to blocks, you’ll find thatsome of these objects can be interacted with and lead you to loss, while others are purely for appearance. Additionally, each object in this section comes with a built-in animation.
Pixel Art
If you want to create a pixel art appearance for your levels, this section will be useful.All objects here serve as appearance objects, and you may’t interact with them.
Items
These objects are used ascollectiblesthat can be picked up during gameplay, such as coins.
Symbols
This section includes someicons that can be used to communicatewith players in your levels.
Decorations
Another section includesdecorative objectsthat allow for more flexible customization of the level’s appearance.
Rotating Objects
This section includes manycircular objectsthat automatically rotate, such as saws.Some lead to loss if you interact with them,and others work as decorative objects.
The speed and directionof all these objects can be customized easily. To do this, select the object you want to edit and click the “Edit Special” button. You can disable it, which leads the object to stop, or click on"Custom"to handle degrees per second. If you input a negative value, it will rotate the other way.
Triggers
Triggers are more intricate objects that offer limitless customization. For instance, a move trigger can make objects move when you reach a specific location.You manage them using IDs, and the trigger itself is invisible in the level. To handle this,select the trigger you wantto work with andclick the “Edit Object” button.
Custom Objects
This section starts empty, andyou can save the custom objects you created here. After selecting them, just click on the plus button to save or delete them by using the minus button.
Start Creating Levels
Now that you understand what each section and button does in the level editor, you’re able to start placing objects and creating your own level. However, with this wealth of content, it’s common to feel overwhelmed and unsure where to start or how to create a balanced level.
Create levels correctly bystarting small.Build parts from the main levelsor include elements from other players' creations. Additionally,you can copy levels from other playersif they are enabled to copy.
You also have the option to enable copying and set a password for access. you may do this when uploading your levelfrom the Share Level panel by clicking on the gear icon.
Don’t forget that practice is the key to achieving perfection in any work, and this holds for creating levels.Practice and experiment with the features you want to include in your levels, starting with the easiest ones.
